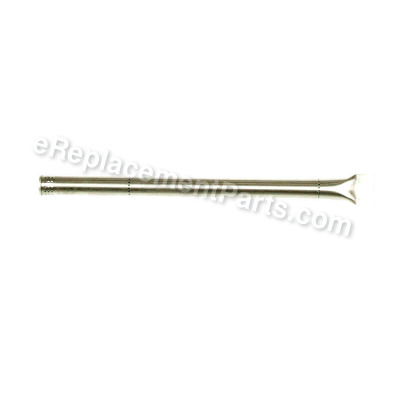
This is a genuine Char-Broil replacement part, it is sold individually.
This is the part of the Grill that the flame is coming from on your Gas Grill.
Depending on your grill you may have 3 or 4 of these.
To connect these to your grill, place the flat side of the Burner in the rear side of the firebox in the slots provided.
The front of the burner will connect to the Electrode W/ Wire/Collector.
They will connect to the Hose Valve Regulator, and then the Control Knobs will be attached, so the flame can be controlled.
This part includes one threaded pin and one cotter pins.
Main Burner For Firebox 80029717
OEM part for: Char-Broil
Part Number: 80029717
Install
Videos!
Watch The
Repair Video
Repair Video
$13.69
In Stock
Jump To:
Product Description ?
- Classification: Part
- Weight: 0.53 lbs.
- Shipping: Ships Worldwide
Frequently Purchased Together ?


Compatibility
This Main Burner For Firebox will fit the following 72 machines. Confirm this part works with your model, and view the detailed model diagrams and repair help we have to offer.
Displaying 20 of 72 matching models.
Char-Broil
Show More Compatible Models72 total model matches. Try the above search to narrow your results.
This is the official OEM part for the following brands:
- Char-Broil
This item works with the following types of products:
- Range
This part replaces obsolete part #: G527-2200-W1 (Stainless Steel), G355-0300-W1, G515-2200-W1, 80017579
Repair Videos ?

Articles:
|
Having trouble getting your grill to light up? A common cause of this issue is a defective ignition switch. We'll sho...
November 08, 2012
|

Customer Part Reviews ?
Average Rating (out of 5):
Click to filter by ratings:
5 stars
21
4 stars
0
3 stars
0
2 stars
1
1 stars
0
< PREV
- 1
- 2
- 3
Great part, unavailable from the OEM (!).
Perfect fit and super-low price.
Guest -
December 29, 2023
Verified Purchase
easy repair.
Burners Great, But if I knew what I was doing Iwould have bought the cross over parts also.
Guest -
September 19, 2023
Verified Purchase
Perfect replacement part
Quick delivery and packaged great. Fit CharBroil grill as expected.
David -
August 18, 2023
Verified Purchase
Perfect part
Arrived quickly, installed easily
Guest -
June 13, 2023
Verified Purchase
Grill Repair
Parts worked perfectly, back to grilling!
Guest -
June 10, 2023
Verified Purchase
Great parts, everything fit, fast shipping
I have ordered multiple times over the past few years to rebuild my old grill. This time it was burners.
Guest -
March 21, 2023
Verified Purchase
All was satisfactory
Parts arrived quickly, fit and worked perfectly. Can use my grill again.
Guest -
July 7, 2022
Verified Purchase
Easy to install and was exactly as shown
When it comes to ordering parts getting them online can be scary but this was simple and exactly what I needed and easy to install.
Guest -
February 14, 2022
Verified Purchase
Great Customer Service/Replacement Parts
I would not look anywhere else for replacement parts. They had what I needed and the part work great. Not to mention the best customer service I’ve experienced in a long time.
Guest -
September 3, 2021
Verified Purchase
Easy to find correct part needed, arrived in just a few days, and fit perfectly in the grill. Grill works great now!!
Part was easy to find online and worked great!
Anonymous -
August 17, 2021
Verified Purchase
Questions & Answers ?
Our customer Service team is at the ready daily to answer your part and product questions.

Ask our Team
We have a dedicated staff with decades of collective experience in helping customers just like you purchase parts to repair their products.
Does this fit my product?Questions & Answers for Main Burner For Firebox
How long are the burner tubes?
Bob
for model number 463625219
asked on 2023-04-10
Hello Bob, Thank you for your inquiry. We show the main burner tubes are 17 3/4 inches long. We hope this helps.
eReplacementParts Team April 10, 2023
I am looking to buy main burners and heat tent can you send me a link it's a 5 burner
Amar
for model number 463215515
asked on 2023-11-21
Hi Amar,
Thank you for your question. The part number for the main burner is 80029717. The part number for the heat tent is G614-0045-W1. The part number for the heat tent used for the searing burner is G570-0012-W1. The parts are sold individually. We hope this helps!
eReplacementParts Team November 21, 2023
Need main burner and carry over tube
William
for model number 463344015
asked on 2022-01-30
Hello William, thank you for your question. The main Burner Tube is A432-0100-W1 and the carry over tube is G651-0068-W1. Good luck and have a great day.
eReplacementParts Team January 30, 2022
Customer Repair Instructions ?
All our customer repair instructions are solicited directly from other customers just like you who have purchased and replaced this exact part.
Main burners rusted out bad.
scott - January 31, 2016
👍 11 of 13 people found this instruction helpful
Tool Type
Outdoor Grill
Difficulty
Easy
Time
Less than 15 minutes
Tools Used
Screwdriver, Pliers
Simply remove parts to get to burners, disconnect starter with screwdriver, remove old cotter pins with pliers, install new parts.
Did you find this story helpful?
Thanks for voting and helping fellow customers!
The burners and the crossover tubes on the grille were rusted through causing severe hot spots in some reason and overall undesired operation. I replaced the ignitor electrodes because they were inex
Christopher - April 29, 2017
👍 10 of 12 people found this instruction helpful
Tool Type
Outdoor Grill
Difficulty
Easy
Time
Less than 15 minutes
Tools Used
Pliers
1. Shut off and disconnected the LP supply.
2.Removed the Grille grate and the 4 heat deflectors.
3. Removed retainer clips holding burners and cross over tubes.
4. Pulled burner tubes partially away from control valve and disconnected ignitor electrodes.
5. Removed all 4 burners tubes and 3 crossover tubes.
6. Unplugged the ignitor electrodes from the Spark module.
7. Took the opportunity to clean the inner fire box and inspect for any other signs of wear and tear.
8. Routed 4 ignitor electrodes through valve holes in firebox and plugged them on to the spark module
and snapped the other end of ignitor electrodes on to burner tubes.
9. Installed crossover tubes and clips onto burner tubes.
10. Reinstalled LP supply and checked operation.
11. Shut off grille and Reinstalled heat deflectors and grate.
Did you find this story helpful?
Thanks for voting and helping fellow customers!
Low flame height.
Paul - April 28, 2017
👍 4 of 5 people found this instruction helpful
Tool Type
Outdoor Grill
Difficulty
Easy
Time
15-30 minutes
Tools Used
Pliers
Parts Used
1. Removed and cleaned grates.
2. Removed and cleaned infrared plates.
3. Removed heat shields.
4. Removed pins holding burners.
5. Removed burners.
6. Cleaned around inside firebox.
7. Put in new burners.
8. Put in new pins.
9. Turned on propane and tested.
10. Everything worked great.
2. Removed and cleaned infrared plates.
3. Removed heat shields.
4. Removed pins holding burners.
5. Removed burners.
6. Cleaned around inside firebox.
7. Put in new burners.
8. Put in new pins.
9. Turned on propane and tested.
10. Everything worked great.
Did you find this story helpful?
Thanks for voting and helping fellow customers!
Old parts were rusted out from years of use.
Eugene - May 1, 2016
👍 5 of 7 people found this instruction helpful
Tool Type
Outdoor Grill
Difficulty
Easy
Time
15-30 minutes
Tools Used
Screwdriver, Pliers
Parts fit as direct replacements, just remove old parts and clean grill while parts are out of the way, reassemble with the new parts. My grill works like new again was real easy.
Did you find this story helpful?
Thanks for voting and helping fellow customers!
4 main burner tubes, carry over tube assembly and heat tent were rusted and not functional
William - July 25, 2018
👍 3 of 4 people found this instruction helpful
Tool Type
Outdoor Grill
Difficulty
Easy
Time
30-60 minutes
Tools Used
Screwdriver, Pliers
1 Removed all rusted parts to be replaced and cleaned fire box with Shop Vac. This was done prior to placing order which helped me determine exactly what I needed. Approximately 30min.
2 When I received the parts I started with the main burner tubes following the instructions included each tube was inserted and a cotter pin placed on the back end of each tube secured them. Needle Nose pliers made this easy.
3 The carry over tube assembly was next but before you can complete this part you need to screw a small eyelet screw in the front of each burner tube. When this is completed the carry over tubes can be put in place and secured with a cotter pin.
4 The final step was to place the 4 heat tents over each burner. They simply fit into a niche in the fire box over each burner. Approximately 30 min.
Did you find this story helpful?
Thanks for voting and helping fellow customers!
Internals rusted out
Brian - July 11, 2018
👍 2 of 2 people found this instruction helpful
Tool Type
Outdoor Grill
Difficulty
Medium
Time
30-60 minutes
Tools Used
Screwdriver, Pliers
Removed the grill grates and cleaned them
Removed the heat emitters and tossed them
Removed the flame tamers and cleaned them
Unplugged the burner electrodes and removed the rusted out burner tubes
Completely cleaned out the main box
Attached the new igniters to the new tubes and replaced the tubes
Ran the wires to the new ignition module and attached them
Attached the flame carryover tubes
Started the grill, testing each burner
Reset the flame tamers, heat emitters, and grill grates
Did you find this story helpful?
Thanks for voting and helping fellow customers!
Burner and associated parts were rusted, not heating properly
Jean - August 11, 2018
Tool Type
Outdoor Grill
Difficulty
Easy
Time
1-2 hours
Tools Used
Screwdriver, Pliers
This was a very simple repair.
Remove old rusted parts.
Minor clean up of the burner area.
Install replacement parts.
Everything fit in place correctly without modification.
Test for proper operation - good to go!
Remove old rusted parts.
Minor clean up of the burner area.
Install replacement parts.
Everything fit in place correctly without modification.
Test for proper operation - good to go!
Did you find this story helpful?
Thanks for voting and helping fellow customers!
Burners and cross over tube were rusted and falling apart. Nothing was working as it should.
David - July 6, 2018
Tool Type
Outdoor Grill
Difficulty
Medium
Time
30-60 minutes
Tools Used
Screwdriver, Pliers
Took all the grates off grill, then removed the burners and cross over lighter. Not to difficult cause of rust and decay. New parts worked great as they were charbroil grill parts. Bad thing is I saw other repairs that will be needed to be addressed. Everything went smoothly and parts were shipped as promised.
Did you find this story helpful?
Thanks for voting and helping fellow customers!
Rusted parts
Renee - May 26, 2018
Tool Type
Outdoor Grill
Difficulty
Easy
Time
15-30 minutes
Tools Used
, Used a center punch to remove old spring clips.
Very happy with this product. Saved hundreds of dollars by not having to replace our grill.
Did you find this story helpful?
Thanks for voting and helping fellow customers!
Uneven heating due to blocked gas tubes. Corroded heat tents.
john - April 24, 2018
Tool Type
Outdoor Grill
Difficulty
Easy
Time
Less than 15 minutes
Tools Used
Screwdriver
1. Remove the grill grates.
2. Remove the old heat tents.
3. Remove the cotter pins from the carryover tube assemblies.
4. Remover the cotter pins from the gas tubes.
5. Replace in the reverse order.
2. Remove the old heat tents.
3. Remove the cotter pins from the carryover tube assemblies.
4. Remover the cotter pins from the gas tubes.
5. Replace in the reverse order.
Did you find this story helpful?
Thanks for voting and helping fellow customers!
Load More Install Stories
OEM stands for Original Equipment Manufacturer and means the part you’re buying is sourced directly from the manufacturer who made your product. At eReplacementParts, we sell only genuine OEM parts, guaranteeing the part you’re purchasing is of better design and of higher quality than aftermarket parts.
Learn MoreOur product descriptions are a combination of data sourced directly from the manufacturers who made your product as well as content researched and curated by our content & customer service teams. This content is edited and reviewed internally before being made public to customers.
Our customer service team are at the ready daily to answer your part and product questions. We have a dedicated staff with decades of collective experience in helping customers just like you purchase parts to repair their products.
All our part reviews are solicited directly from other customers who have purchased this exact part. While we moderate these reviews for profanity, offensive language or personally identifiable information, these reviews are posted exactly as submitted and no alterations are made by our team.
All our customer repair instructions are solicited directly from other customers just like you who have purchased and replaced this exact part. While we moderate these reviews for profanity, offensive language or personally identifiable information, these reviews are posted exactly as submitted and no alterations are made by our team.
Based on data from past customer purchasing behaviors, these parts are most commonly purchased together along with the part you are viewing. These parts may be necessary or helpful to replace to complete your current repair.
All our installation videos are created and produced in collaboration with our in-house repair technician, Mark Sodja, who has helped millions of eReplacementParts customers over the last 13 years repair their products. Mark has years of experience in selling and repairing both commercial and residential products with a specialty in gas-powered equipment.
This data is collected from customers who submitted a repair instruction after replacing this exact part. Customers can rate how easy the repair was to complete and how long it took. We aggregate this data to provide a repair rating that allows customers to quickly determine the difficulty and time needed to perform their own repair.