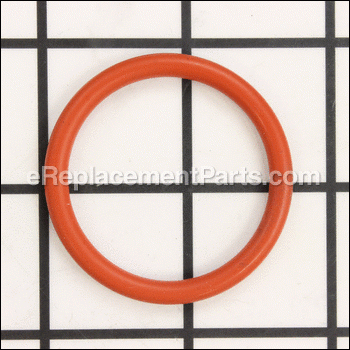
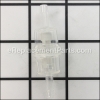
This is a genuine DeLonghi OEM replacement O Ring that is used to seal the filter to the generator. Over time this part will begin to deteriorate and will need to be replaced as the part is made of silicone. If the O Ring for your coffee maker has snapped or become worn, replacing this part will help restore optimum performance to a variety of models.
Specifications:
Outside diameter: 43.6mm. Inside diameter: 35.2mm. Thickness: 4.2mm.
Generator Gasket - Orange 5332149100
OEM part for: DeLonghi
Part Number: 5332149100
$5.19
In Stock
Jump To:
Product Description ?
- Classification: Part
- Weight: 0.00 lbs.
- Shipping: Ships Worldwide
Frequently Purchased Together ?


Compatibility
This Generator Gasket - Orange will fit the following 107 machines. Confirm this part works with your model, and view the detailed model diagrams and repair help we have to offer.
Displaying 20 of 107 matching models.
DeLonghi
Show More Compatible Models107 total model matches. Try the above search to narrow your results.
This is the official OEM part for the following brands:
- DeLonghi
This item works with the following types of products:
- Coffee Maker
- Espresso
This part replaces obsolete part #: B2014
Customer Part Reviews ?
Average Rating (out of 5):
Click to filter by ratings:
5 stars
12
4 stars
0
3 stars
1
2 stars
0
1 stars
0
< PREV
- 1
- 2
great service, parts that work!
I order these gaskets infrequently but eReplacement always comes through.
Eric -
December 30, 2023
Verified Purchase
a tad "unsure"
I had decided go through the deep cleaning process of my. espresso machine, I found a video that walked through the cleaning process. There were 2 gaskets that should be changed, found this company and placed my order for 3 (one spare incase I screwed up). I had some doubts about ordering part from a company that I had never heard of and getting my order right, the part is called Generator Gasket - not what expected and ya never know with internet these days. No worries! The gaskets are perfect, my machine now makes a damn good espresso! I cannot say enough good stuff. that's my story and I'm sticking with it...jt
Guest -
March 2, 2023
Verified Purchase
Repair Delonghi
Arrived quickly easy repair Thanks
Patrick -
February 14, 2023
Verified Purchase
Great products, prompt service
Every 6 months I replace the o rings in my Delonghi espresso machine. These work perfectly & have kept my machine humming along😀
Eric -
December 31, 2021
Verified Purchase
Fast Service
Price was a bit higher than I would have preferred, but service and delivery was very fast. You get what you pay for.
Guest -
August 6, 2020
Verified Purchase
Excellent service
The parts I ordered came quickly and were exact replacements for the OEM parts.
iGlobal -
November 27, 2019
Verified Purchase
Whew! Perfect part found!
The part was perfect and my DeLonghi Espresso machine is working once again!!
Guest -
November 23, 2019
Verified Purchase
This was preventive maintenance. Was easy to do.
The parts were as expected, worked as expected.
Guest -
November 8, 2019
Verified Purchase
Exact replacement.
The replacement gasket was the same as the original gasket.
iGlobal -
October 22, 2019
Verified Purchase
Perfect fit, all good.
everything was as advertised! thanks guys
Joshua -
August 28, 2019
Verified Purchase
Questions & Answers ?
Our customer Service team is at the ready daily to answer your part and product questions.

Ask our Team
We have a dedicated staff with decades of collective experience in helping customers just like you purchase parts to repair their products.
Does this fit my product?Questions & Answers for Generator Gasket - Orange
No questions have been asked yet
Customer Repair Instructions ?
All our customer repair instructions are solicited directly from other customers just like you who have purchased and replaced this exact part.
Espresso pucks were wet and not ejecting properly
Vito - August 17, 2018
👍 4 of 5 people found this instruction helpful
Tool Type
Coffee Maker
Difficulty
Easy
Time
15-30 minutes
Tools Used
Screwdriver, Nutdriver
Parts Used
1. Removed, cleaned and disassembled generator unit.
2. Removed 2 O-rings on generator unit and one on boiler.
3. Lubed and replaced O-rings.
4. Lubed moving parts in generator and reassembled.
Espresso pucks are now packed tight and eject completely. The coffee is now brewing properly.
2. Removed 2 O-rings on generator unit and one on boiler.
3. Lubed and replaced O-rings.
4. Lubed moving parts in generator and reassembled.
Espresso pucks are now packed tight and eject completely. The coffee is now brewing properly.
Did you find this story helpful?
Thanks for voting and helping fellow customers!
Espressor machine quit working.
Chuck - January 13, 2017
👍 4 of 5 people found this instruction helpful
Tool Type
Coffee Maker
Difficulty
Easy
Time
15-30 minutes
Tools Used
Screwdriver
Parts Used
1. From YouTube, I realized that there was cleaning/maintenance that I had not performed (and was not described in the manual).
2. After investigation, I decided to replace some O-Rings and ordered them and some food-safe grease for lubrication.
3. I disassembled the unit based on info form YouTube.
4. Cleaned the parts.
5. Replaced the O-Rings.
6. Lubricated all available sliding surfaces.
7. Reassembled the unit.
8. All is working well and with much less strange noise.
Did you find this story helpful?
Thanks for voting and helping fellow customers!
This was preventive maintenance to prevent loss of water pressure on coffee puck.
Michael - November 8, 2019
👍 2 of 2 people found this instruction helpful
Tool Type
Coffee Maker
Difficulty
Medium
Time
30-60 minutes
Tools Used
Screwdriver, Food grade grease.
Parts Used
Opened coffee maker case, removed generator from interior. (Generator designed to remove for routine cleaning on periodic basis.) Once generator removed, pushed interior sleeve down inside generator, removed retaining clip on bottom of sleeve and pushed sleeve up and out of generator. The sleeve has two "generator gaskets" or large "O" rings. Replace those "O" rings and lubricated sleeve with food grade grease. Replace sleeve into generator and replaced retaining clip.
Looking inside machine where generator was located, there is a "piston" that has a 3rd "O" ring. Reach inside the machine and remove the "O" ring. Replace that "O" ring and again add slight amount of grease. Before putting the generator back in place, remove the metal screen on top of the sleeve and clean the screen to allow better water flow through it. Replace the screen.
Put the generator back in place and that preventive maintenance should be good for several years depending on usage. Mine was 4 years and the old "O" rings were still reasonably good.
Did you find this story helpful?
Thanks for voting and helping fellow customers!
Loud operation, coffee pucks not forming and making a mess inside door and taste was off.
M - May 22, 2019
👍 1 of 1 people found this instruction helpful
Tool Type
Coffee Maker
Difficulty
Easy
Time
Less than 15 minutes
Tools Used
, allen wrench
1. Found YouTube channels showing what the problem could be.
2. Found your site and with the excellent diagrams was able to order exactly what I needed. (wish I had asked what size grid was used to take pictures of o-ring gaskets)
3. Took generator/fuser out and took apart to clean and replace gaskets.
4. Bought food grade lubricant and applied. Applied more when I thought I had enough.
5. Put back together, checking the smooth movements of the insides.
6. Less noise and coffee pucks are normal.
7. Coffee tastes better after removing back cover, removing tube, cleaning by using a tube turner (fabric tube turner tool) to pull 5 strands of worsted yarn soaked in bleach solution.
Did you find this story helpful?
Thanks for voting and helping fellow customers!
Gasket on DeLonghi Magnifica failed after 11 years, and dropped into maker interior.
Susan - October 21, 2017
👍 1 of 1 people found this instruction helpful
Tool Type
Coffee Maker
Difficulty
Easy
Time
Less than 15 minutes
Tools Used
, No tools required
Parts Used
Slid new gasket into place. That was it.
Did you find this story helpful?
Thanks for voting and helping fellow customers!
full service strip, clean, diagnose and repair
steve - February 22, 2017
👍 3 of 5 people found this instruction helpful
Tool Type
Coffee Maker
Difficulty
Medium
Time
More than 2 hours
Tools Used
Screwdriver, Pliers
This beautiful bean to cup machine had had a hard life when I picked it up on eBay, but the seller said the machine turned on and warmed up. Critical to a cost effective repair. These things need a deep clean...A complete strip-down..Even when normally working. This machine didn't appear to have ever had a clean.
Strip down revealed the big seals on the piston and infuser were choked with old coffee, and had gone brittle.
The final problem was a leaky o ring on the boiler, and a broken clip.
Strip down revealed the big seals on the piston and infuser were choked with old coffee, and had gone brittle.
The final problem was a leaky o ring on the boiler, and a broken clip.
Did you find this story helpful?
Thanks for voting and helping fellow customers!
Water leaked from coffee machine
Robert - March 3, 2016
👍 4 of 7 people found this instruction helpful
Tool Type
Coffee Maker
Difficulty
Easy
Time
Less than 15 minutes
Tools Used
, No tools required
Parts Used
Opened service door on Delonghi espresso coffee machine, slipped old gasket off and inserted new gasket. Automatic espresso machine worked perfect ever since gasket replaced.
Did you find this story helpful?
Thanks for voting and helping fellow customers!
Generator gasket broke.
Justin - February 4, 2019
Tool Type
Coffee Maker
Difficulty
Easy
Time
Less than 15 minutes
Tools Used
, Old toothbrush
Parts Used
1. Removed broken generator gasket.
2. Used toothbrush to thoroughly clean the gap where the gasket sits.
3. Slid new gasket into place.
2. Used toothbrush to thoroughly clean the gap where the gasket sits.
3. Slid new gasket into place.
Did you find this story helpful?
Thanks for voting and helping fellow customers!
Leaked coffee
John - January 18, 2019
Tool Type
Coffee Maker
Difficulty
Easy
Time
15-30 minutes
Tools Used
Screwdriver
Parts Used
Followed the instructions that were posted and worked well.
Did you find this story helpful?
Thanks for voting and helping fellow customers!
Was not making good pucks.
William - January 5, 2019
Tool Type
Coffee Maker
Difficulty
Easy
Time
Less than 15 minutes
Tools Used
Screwdriver, N/a
Parts Used
Pulled o-ring from generator and installed new one. I did lube the o-ring and cleaned the head while in the machine.
Did you find this story helpful?
Thanks for voting and helping fellow customers!
Load More Install Stories
OEM stands for Original Equipment Manufacturer and means the part you’re buying is sourced directly from the manufacturer who made your product. At eReplacementParts, we sell only genuine OEM parts, guaranteeing the part you’re purchasing is of better design and of higher quality than aftermarket parts.
Learn MoreOur product descriptions are a combination of data sourced directly from the manufacturers who made your product as well as content researched and curated by our content & customer service teams. This content is edited and reviewed internally before being made public to customers.
Our customer service team are at the ready daily to answer your part and product questions. We have a dedicated staff with decades of collective experience in helping customers just like you purchase parts to repair their products.
All our part reviews are solicited directly from other customers who have purchased this exact part. While we moderate these reviews for profanity, offensive language or personally identifiable information, these reviews are posted exactly as submitted and no alterations are made by our team.
All our customer repair instructions are solicited directly from other customers just like you who have purchased and replaced this exact part. While we moderate these reviews for profanity, offensive language or personally identifiable information, these reviews are posted exactly as submitted and no alterations are made by our team.
Based on data from past customer purchasing behaviors, these parts are most commonly purchased together along with the part you are viewing. These parts may be necessary or helpful to replace to complete your current repair.
All our installation videos are created and produced in collaboration with our in-house repair technician, Mark Sodja, who has helped millions of eReplacementParts customers over the last 13 years repair their products. Mark has years of experience in selling and repairing both commercial and residential products with a specialty in gas-powered equipment.
This data is collected from customers who submitted a repair instruction after replacing this exact part. Customers can rate how easy the repair was to complete and how long it took. We aggregate this data to provide a repair rating that allows customers to quickly determine the difficulty and time needed to perform their own repair.