
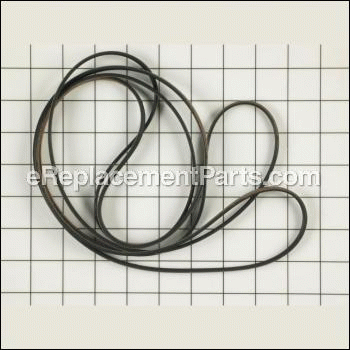


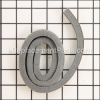
This is a genuine manufacturer-sourced component which is specially designed for Whirlpool washers. The most common reason to replace the drive belt is if it is broken and the dryer drum is not turning. This part is sold individually. Tools needed to replace the drive belt a small flat head screwdriver or putty knife and a Phillips screwdriver.
Dryer Drum Belt 341241
OEM part for: Whirlpool
Part Number: 341241
$12.89
In Stock
Jump To:
Frequently Purchased Together ?

Compatibility
This Dryer Drum Belt will fit the following 4804 machines. Confirm this part works with your model, and view the detailed model diagrams and repair help we have to offer.
Displaying 20 of 4804 matching models.
Whirlpool
Show More Compatible Models4804 total model matches. Try the above search to narrow your results.
This is the official OEM part for the following brands:
- Admiral
- Amana
- Crosley
- Estate
- Inglis
- Jenn-Air
- KitchenAid
- Magic Chef
- Maytag
- Norge
- Roper
- Whirlpool
This item works with the following types of products:
- Dryer
- Range
- Washer
This part replaces obsolete part #: 8066065, 660996, 660997, 349533, TJ341241
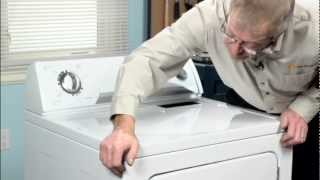
Repair Videos ?
Watch the Repair Video for
Dryer Drum Belt
Customer Part Reviews ?
Average Rating (out of 5):
Click to filter by ratings:
5 stars
1
4 stars
0
3 stars
0
2 stars
0
1 stars
0
< PREV
- 1
perfect fit!
dryer works perfect now . Thank You!
Guest -
January 26, 2022
Verified Purchase
Questions & Answers ?
Our customer Service team is at the ready daily to answer your part and product questions.

Ask our Team
We have a dedicated staff with decades of collective experience in helping customers just like you purchase parts to repair their products.
Does this fit my product?Questions & Answers for Dryer Drum Belt
Cannot find this model number on the list- needs a belt! How long is the belt for this dryer?
Frank
for model number WED4815EW1
asked on 2022-08-08
Hello Frank, Thank you for contacting us. We have researched the model you have provided and have found the part you are looking for is Part Number: 341241 for the Drive Belt. If you need help placing an order, customer service is open 7 days a week. Please feel free to give us a call. We look forward to hearing from you!
eReplacementParts Team August 08, 2022
Customer Repair Instructions ?
All our customer repair instructions are solicited directly from other customers just like you who have purchased and replaced this exact part.
Dryer drum belt was cut
Zamen - October 16, 2017
👍 4 of 4 people found this instruction helpful
Tool Type
Dryer
Difficulty
Medium
Time
15-30 minutes
Tools Used
Screwdriver, Socket set
Parts Used
Took the front covers apart and got to the drum and belt and replaced it.
Did you find this story helpful?
Thanks for voting and helping fellow customers!
Drive belt broke
Eldred - June 28, 2017
👍 5 of 6 people found this instruction helpful
Tool Type
Dryer
Difficulty
Easy
Time
15-30 minutes
Tools Used
Screwdriver, Socket set
Parts Used
Remove front and replace belt
Did you find this story helpful?
Thanks for voting and helping fellow customers!
Dryer drive belt broke. Dryer ran, but drum wouldn't turn
Dwight - September 5, 2018
👍 1 of 1 people found this instruction helpful
Tool Type
Dryer
Difficulty
Medium
Time
30-60 minutes
Tools Used
Screwdriver, Nutdriver
Parts Used
1. Unplugged dryer.
2. Removed the lint filter and removed the two Phillips screws inside lint filter lid.
3. Using a paint scraper, insert under the top about 2" from the right corner, push the scraper in between the top and the front panel to release the snap connector, then pry release the top right hand side. Repeat for left hand side.
4. With both front corners released, lift top over all the way.
5. Using a 5/16 nut driver, remove the two screws on the top of the left and right inside panels.
6. Disconnect the connector for the door switch.
7. Lift front panel and remove front from the rest of the dryer. The bottom is held in place by a clip which will release when the front is lifted.
8. Slip belt over drum, using the wear mark on drum to establish is original position.
9. Prop up the drum to give clearance when completing install of the belt. Having a helping hand is recommended if available.
10. Reach under the drum and string the belt through the belt tensioner and over the pulley on the end of the motor shaft.
11. With belt in place and strung over the belt tensioner and over the pulley, support the drub while fitting the front in place.
12. With front in place and secured, rotate drum to ensure the seal to the rear is in place.
13. Reassemble the remaining dryer components in reverse order.
Plug in dryer and test.
Did you find this story helpful?
Thanks for voting and helping fellow customers!
Drive belt worn out and broken
Michael - July 9, 2018
👍 1 of 1 people found this instruction helpful
Tool Type
Dryer
Difficulty
Easy
Time
15-30 minutes
Tools Used
Screwdriver, Socket set, Nutdriver
Parts Used
Lifted the top of the drier tilted back then removed front panel, removed drum, inspected idler pulley and it was fine. Took extra time to get all the duct work and drier lint free.Then placed belt around the drum re installed drum routed belt through idler pulley on to the motor pulley re installed front panel and top.
Did you find this story helpful?
Thanks for voting and helping fellow customers!
Noisy when running
robert - April 7, 2018
👍 1 of 1 people found this instruction helpful
Tool Type
Dryer
Difficulty
Medium
Time
30-60 minutes
Tools Used
Screwdriver, Nutdriver
Parts Used
I removed the dryer drum. Cleaned out the cabinet and installed the new drive belt. The video on the repair was very helpful
Did you find this story helpful?
Thanks for voting and helping fellow customers!
Dryer belt broke
Richard - January 13, 2024
Tool Type
Dryer
Difficulty
Easy
Time
15-30 minutes
Tools Used
Screwdriver, Nutdriver
Removed top of dryer
Removed front of dryer
Lifted out drum and replaced belt, rollers and idler pully
Hardest part was putting drum back in place but it wasn't the bad
Removed front of dryer
Lifted out drum and replaced belt, rollers and idler pully
Hardest part was putting drum back in place but it wasn't the bad
Did you find this story helpful?
Thanks for voting and helping fellow customers!
Drum wouldn't turn when loaded with wet laundry
James - March 1, 2023
Tool Type
Dryer
Difficulty
Medium
Time
30-60 minutes
Tools Used
Screwdriver, Scraper
Parts Used
Took the drum out removed drum rollers scotch brighted shafts with 3000 grit until shiny . Sprayed a dry lubricant on shafts and replaced rollers . The idler pulley was good and some plastic rubbing blocks cleaned up as well. Next I dropped new belt over drum and reattached it to idler pulley. Reassembled everything and now I can dry heavy blankets which it wouldn't do before.
Did you find this story helpful?
Thanks for voting and helping fellow customers!
Tumbler would not rotate
David - February 19, 2022
Tool Type
Dryer
Difficulty
Easy
Time
30-60 minutes
Tools Used
Nutdriver
Parts Used
Removed 2 screws in front cover, checked bearings in pulleys, slipped belt over drum and reinstalled front cover. Also cleaned all lint out of vent in front cover while off.
Did you find this story helpful?
Thanks for voting and helping fellow customers!
Belt broke
Vito - February 7, 2022
Tool Type
Dryer
Difficulty
Medium
Time
30-60 minutes
Tools Used
Screwdriver, Nutdriver, Flash light and mirror
Parts Used
***unplug unit from wall first***
1. Lifted top with flat head screw driver gently.
2. Loosened to hex bolts.
3. Detached electrical connections
4. Removed front dryer panel and put aside.
5. Removed broken belt from bottom of unit.
6. Installed belt on unit.
***' This dryer had no rear access. I had to use mirror and flashlight to see what I was doing. The pulley on motor is quite small. The tension are is opposite of what you feel. You need to reach in and see which way the spring pulls on to set belt. ****
Did you find this story helpful?
Thanks for voting and helping fellow customers!
Belt broke
Joseph - September 23, 2021
Tool Type
Dryer
Difficulty
Easy
Time
30-60 minutes
Tools Used
Screwdriver, Nutdriver
Remove 2 screws at lent trap door
Lift top from front
Remove two screws inside front panel
Remove front panel
Remove drum, idler wheels and tensioner
Replace idler wheels and tensioner, belt drum and front cover with front cover screws
Move belt over motor pully and tensioner
Test drum rotation
Lower top install two screws at lent trap door
Did you find this story helpful?
Thanks for voting and helping fellow customers!
Load More Install Stories
OEM stands for Original Equipment Manufacturer and means the part you’re buying is sourced directly from the manufacturer who made your product. At eReplacementParts, we sell only genuine OEM parts, guaranteeing the part you’re purchasing is of better design and of higher quality than aftermarket parts.
Learn MoreOur product descriptions are a combination of data sourced directly from the manufacturers who made your product as well as content researched and curated by our content & customer service teams. This content is edited and reviewed internally before being made public to customers.
Our customer service team are at the ready daily to answer your part and product questions. We have a dedicated staff with decades of collective experience in helping customers just like you purchase parts to repair their products.
All our part reviews are solicited directly from other customers who have purchased this exact part. While we moderate these reviews for profanity, offensive language or personally identifiable information, these reviews are posted exactly as submitted and no alterations are made by our team.
All our customer repair instructions are solicited directly from other customers just like you who have purchased and replaced this exact part. While we moderate these reviews for profanity, offensive language or personally identifiable information, these reviews are posted exactly as submitted and no alterations are made by our team.
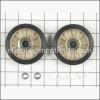
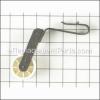
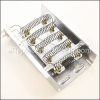
Based on data from past customer purchasing behaviors, these parts are most commonly purchased together along with the part you are viewing. These parts may be necessary or helpful to replace to complete your current repair.
All our installation videos are created and produced in collaboration with our in-house repair technician, Mark Sodja, who has helped millions of eReplacementParts customers over the last 13 years repair their products. Mark has years of experience in selling and repairing both commercial and residential products with a specialty in gas-powered equipment.
This data is collected from customers who submitted a repair instruction after replacing this exact part. Customers can rate how easy the repair was to complete and how long it took. We aggregate this data to provide a repair rating that allows customers to quickly determine the difficulty and time needed to perform their own repair.